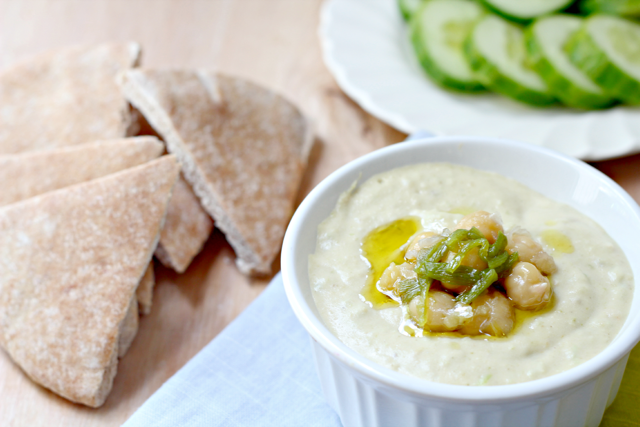
Hatch Chile Hummus
Add a little spice to your life, or at least your hummus. Let’s start there. It’s Hatch Chile Hummus!


Now that I’ve been in Austin for nearly five years, there are some aspects of Texas living that have become the norm. Brisket is a breakfast option. The supermarket has a whole aisle of tortilla options, but nary an English muffin in sight. I have actually seen people using a horse as a mode of transportation. And when August rolls around, it’s hatch season. The New Mexican chiles take over this town, where you can buy anything from hatch chile burgers to hatch chile cheesecake. For reals. Luckily, you can buy them online now, so you non Texans can have a hatch fix. Whew. What did I make with my hatch chiles? Hummus, of course.


Drain the chickpeas (saving the cooking liquid) and put them in a food processor with the chiles and puree. Then add lemon juice, tahini, garlic, cumin, olive oil and reserved cooking liquid and puree until smooth.
Season with salt and pepper to taste, let sit for 30 minutes and garnish with olive oil, chickpeas and diced chiles and eat!

This hummus is on fiiirrreee!

Hatch Chile Hummus
Ingredients
- ½ cup dried chickpeas pickled through and washed well (makes 1 1/2 cups)
- 1 teaspoon baking soda
- 3 cups water
- 3 hatch chiles roasted and peeled, plus reserve a bit for garnish. You can buy them pre-roasted! I used the hot ones 🙂
- 1 lemon juiced
- ¼ cup good quality tahini
- 2 clove garlic smashed
- ½ teaspoon ground cumin
- 4 tablespoons extra virgin olive oil plus more for garnish
- 3 tablespoons or more reserved cooking liquid
- Salt and pepper to taste
Instructions
-
The night before hummus time, place ½ cup chickpeas with ½ teaspoon baking soda in a large bowl and cover them with cold water at least twice their volume. Soak overnight. The chickpeas will double in volume.
-
The next day, drain and rinse the chickpeas and put them in a large pot with ½ teaspoon baking soda and cook for three minutes, constantly stirring. Add cold water to cover the chickpeas by at least 3 inches and bring to a boil. Skim off foam and cook for 1 hour until chickpeas are very tender and falling apart.
-
Drain the chickpeas (reserve the cooking liquid) and put them in a food processor (reserve a few for garnish) with the chiles and puree. Then add lemon juice, tahini, garlic, cumin, olive oil and 3 tablespoons cooking liquid and puree until smooth. Add more liquid if needed to get desired texture.
-
Season with salt and pepper to taste, let sit for 30 minutes and garnish with olive oil, chickpeas and diced chiles and eat!


21 Comments
BRISKET FOR BREAKFAST?! sign me up.
Move to Texas! Where brisket grows on trees and Shiner flows like, well, beer.
I’m confused by one step here – when you put the soaked chickpeas and soda in the pan and cook for three minutes are you doing that without water?
Yes you add the water after! This helps break down the chickpeas.
Splendidly yummy idea? How jew you come up with it?:-)
Oh mah gahhhhhh Amy. You know I never make hummus at home because it always feels like a complicated order, but this looks so easy and sounds so amazing! Will trade cheesecake for chiles.
Sounds like a plan!
Yum. I’m making this! Love this new twist on hummus.
Yay enjoy!
If I want to cheat and use canned beans, would I use 1 or 2 cans to equal the dried ones. Thanks for your help.
1/2 cup of dried chickpeas will yield about 1 1/4 cup of cooked beans. Enjoy!
whats the purpose of cooking the chickpeas? i have always made hummus with them right out of the can and so does everyone else i know
BTW i love the idea of this i live in Albuquerque and have pretty much endless supply of Hatch Green chile
You can use canned beans, but dried taste WAY better. And this cooking method makes them softer so you have smoother hummus. It’s not too hard- you can do it!
I will have to give that a shot thank you!!
Awesome let me know how it goes!
[…] Hatch chile hummus would make the perfect party dip, so try it this weekend. […]
[…] Hatch Chili Hummus | What Jew Wanna Eat? […]
[…] made some fun variations on hummus in the past (like this Hatch Chile Hummus or this slightly sweet Pomegranate Hummus or this crazy Hummus with Pastrami, Leeks and Shiitakes) […]
Placed my order for fresh hatch chilis months ago, cant wait to try your recipe when the chilis arrive in July!! Yum!
Awesome- hope you enjoy it!